AECP: FINAL CHALLENGE LEVEL 1 - part 1

Živjo!
Pred mano je še zadnje dajenje
prvega levela pri AECP. Tokratno objavo bom zaradi obilice fotografij razdelila
na dva dela.
Erum mi je prijazno poslala
navodila za izvedbo. Izbrati sem morala tri posamezne tehnike, ki smo jih
spoznaili skozi celotno izobraževanje in pripraviti komplet voščilnic zanj in
zanjo. Za oba kompleta je potrebno pripraviti še lično pakiranje.
Pri mojih voščilnicah se bodo verjetno našle prav vse tehnike, ki smo jih tekom prvega dela spoznali. Osredotočila pa sem se na spodnje:
- ALL ABOUT LEYERING: skoraj vse Altenew štampiljke, ki jih imam doma so primerne za takšno tehniko, zato to ne bo prevelik izziv
- LET IT SHINE: nekaj drobnih svetlečih elementov pač mora biti na voščilnici.
- FOR THE GUYS: enkraten del tečaja, ki mi je dal res veliko novih idej, kako ustvariti voščilnice za fante.
- STENCIL TECHNIQUES: z veseljem sem tekom tečaja začela več uporabljati tudi stencil šablone, ne pa da jih samo kopičim doma, ker so mi pač všeč.
Najprej vam pokažem set voščilnic
in embalažo za moški del.
Hello!
Before me is the last giving of the first level at the AECP. I will
divide this post into two parts due to the abundance of photos.
Erum kindly sent me instructions for execution. I had to choose three
individual techniques that we learned throughout the course and prepare a set
of greeting cards for him and her. For both sets, it is necessary to prepare a
nice package.
My greeting cards will probably contain all the techniques we learned
during the first part. However, I focused on the following:
• ALL ABOUT LAYERING: almost all the Altenew stamps I have at home are
suitable for this technique, so it won’t be too much of a challenge.
• LET IT SHINE: a few tiny shiny elements just need to be on the
greeting card.
• FOR THE GUYS: a unique part of the course that gave me really many
new ideas on how to create greeting cards for boys.
• STENCIL TECHNIQUES:
I was happy to use stencil templates more during the course, not just to
accumulate them at home because I like them.
First I show you a set of greeting cards and packaging for the male part.

Za izdelavo vseh voščilnic sem
uporabila en stencil in tudi podobne barvne blazinice.
Pa si poglejmo prvo voščilnico.
Najprej sem si z pomočjo rezalne šablone izrezala pravokotnik, ki mi je služil
za osnovo voščilnice. Odločila sem se, da bom na vseh voščilnicah uporabila
Cube Builder stencil šablono, zato sem si najprej pripravila vsa ozadja, ki sem
jih želela uporabiti.
Na spodnji voščilnici sem
uprabila Altenew blazinice v odtenkih Misty Morning, Nimbus in pa Dark Night.
Stencil sem si na voščilnici
maskirala tako da sem uporabila samo tri vrste stencila in dobila posenčen samo
rob voščilnice. Ker pa sem želela še nekaj kock na drugem delu voščilnice, sem
s pomočjo maskirnega traku naredila še tri posamezne kocke, in tako zapolnila
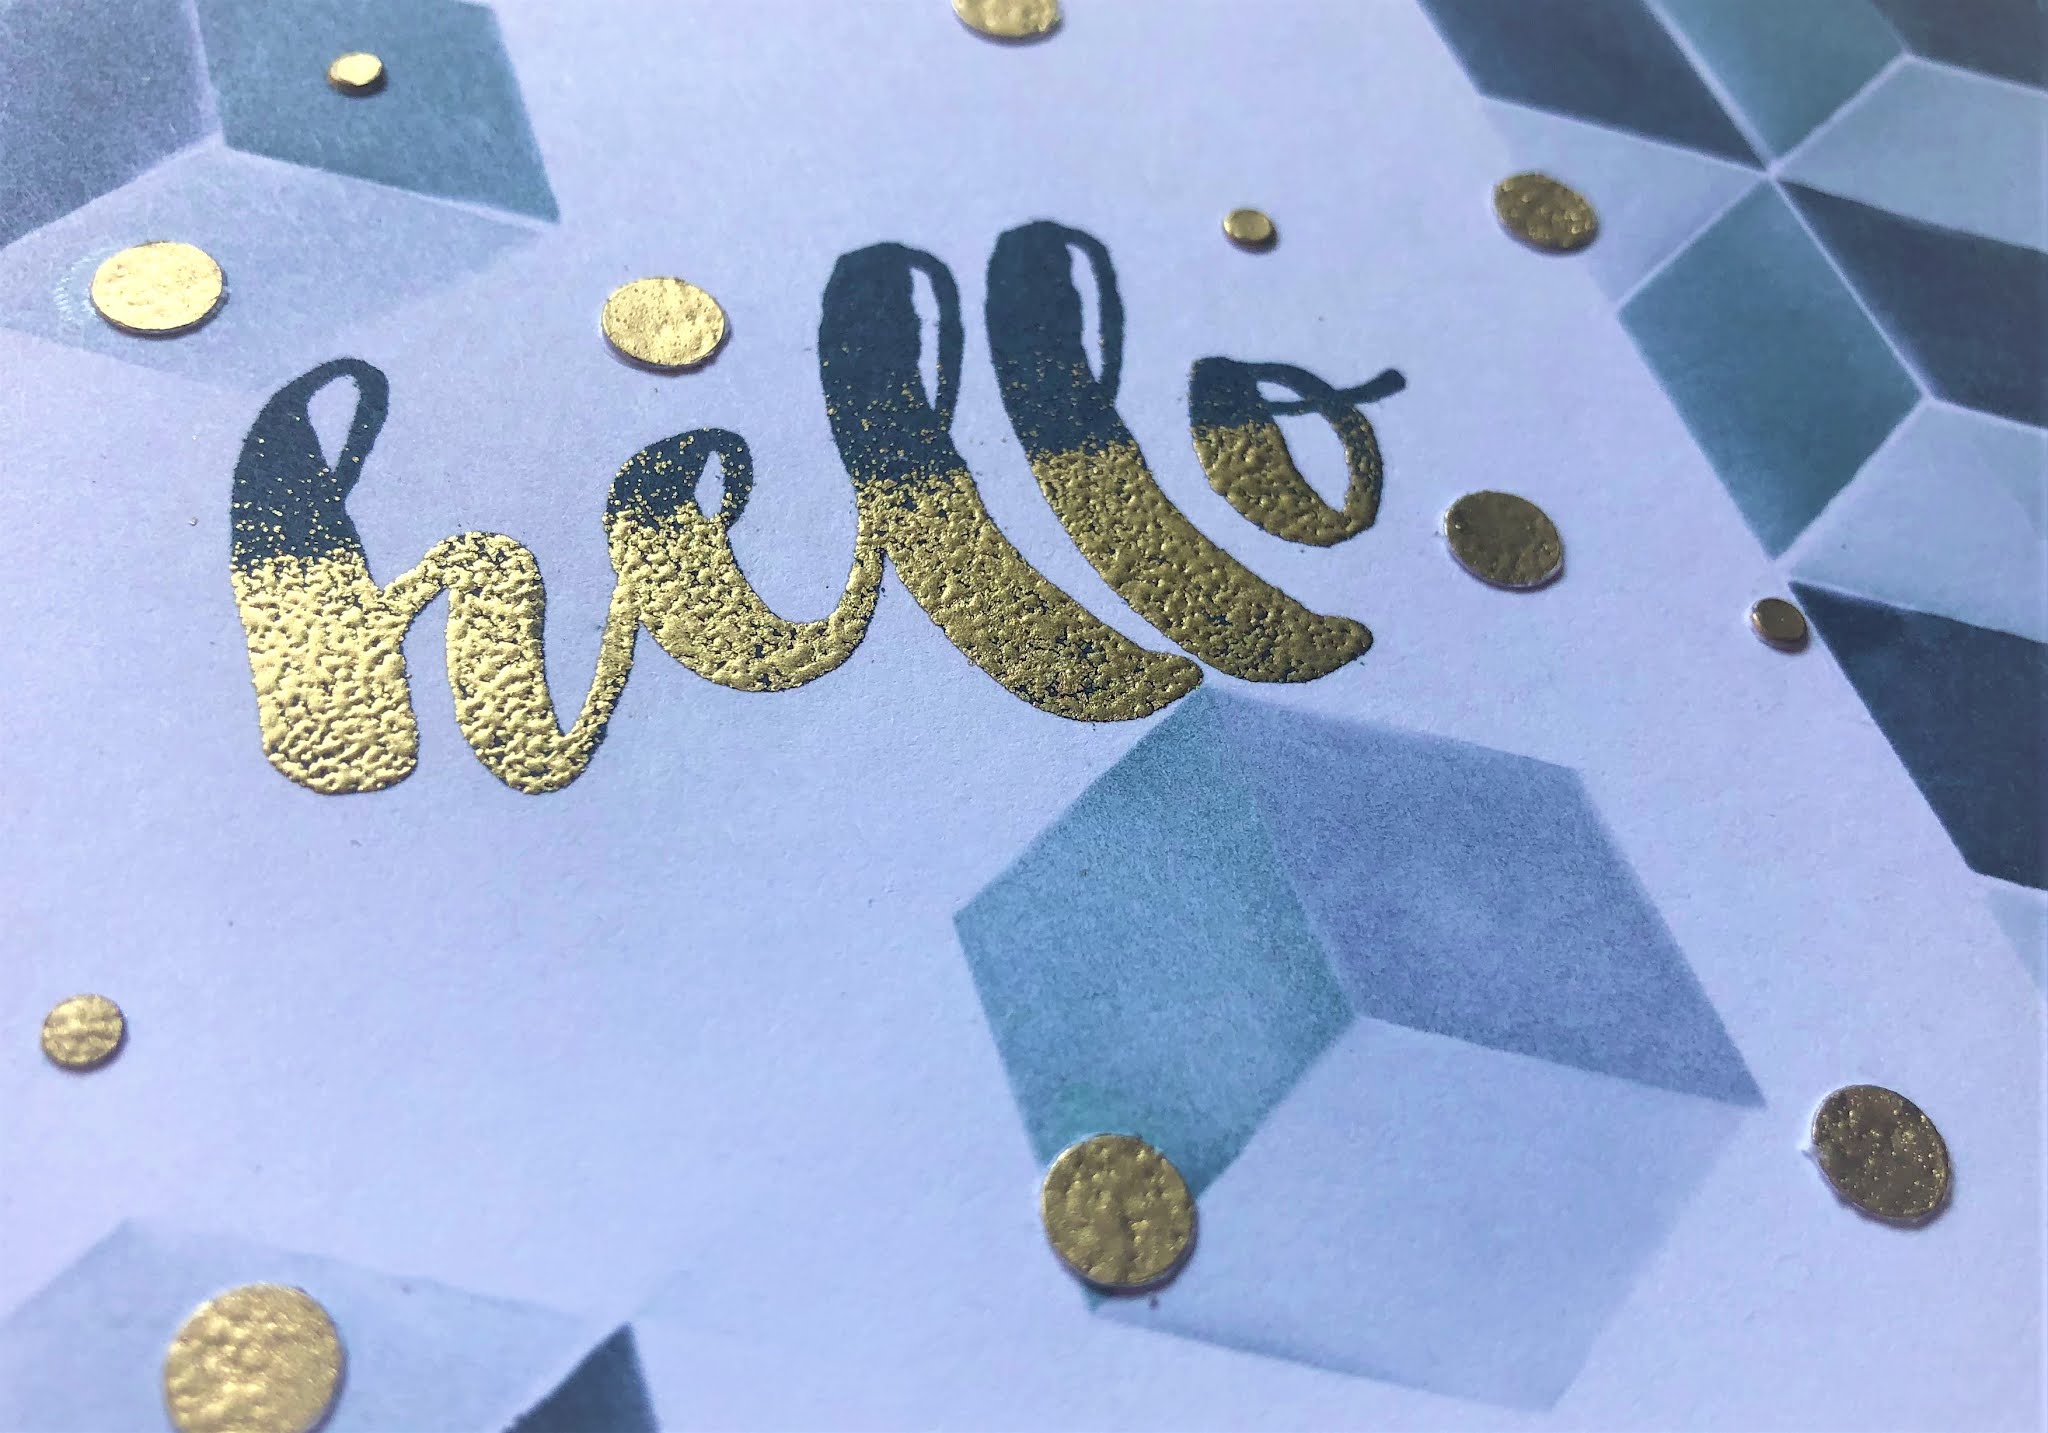
praznino voščilnice. Da celotna voščilnica, ni bila preveč modra sem se
odločila napis najprej odtisniti z modro blazinico Dark Night nato pa del
napisa embosirati z zlatim embosing prahom Antique gold od Altenew. Še vedno mi
je na voščilnici nekaj manjkalo zato sem si zlato embosirala še ostanek papirja
iz katerega sem nato z luknjačem izrezala nekaj krogcev v dveh velikostih.
Za ozadje pa sem posenčila še en
kartonček v odtenku Dark Night in ga podložila pod izdelano voščilnico. Vse
skupaj sem nalepila še na osnovo in voščilnica je bila končana.
I used one stencil to make all the cards and also similar ink pads.
Let's take a look at the first card. First, I used a cutting die to cut
out a rectangle that served as the base of the card. I decided to use
the Cube Builder stencil template on all the g cards, so I preferred to
prepare all the backgrounds I wanted to use.
On the greeting card below, I used Altenew pads in shades of Misty
Morning, Nimbus, and then Dark Night.
I masked the stencil on the card by using only three rows of stencils
and got shaded only the edge of the card. However, because I wanted a few more
cubes on the other part of the card, I used masking tape to make three more
individual cubes, thus filling the void of the greeting card. To make the whole card not too blue, I decided to stamp the sentiment first with a blue
Dark Night ink pad and then emboss part of the sentiment with antique gold
embossing powder from Altenew. I was still missing something on the card, so I
embossed the paper with gold, from which I then cut out a few circles in two
sizes with a hole punch.
For the background, I shaded another card in the shade Dark Night and
placed it under the made card. I glued it all together on the base and the card
was finished.


Tudi na tej voščilnici sem
uporabila stencil šablono cube builder. Tokrat sem za senčenje ozadja uporabila
le dve barvi – Nimbus in Dark night. Za osrednji motiv pa sem tokrat izbrala
Monstero rezalne šablone, ki sem jih najprej izrezala iz belega kartončka, ki
sem ga s tehniko direct to paper pobarvala z mountain pine barvno blazinico.
Sence monstere sem dvakrat embosirala z zlatim antique gold embosing prahom in
jih izrezala s pripadajočimi rezalnimi šablonami. Na koncu sem si v barvah
ozadja pripravila še cvetlični lonec kamor sem razporedila liste monstere. V
zalogi izrezov, ki jih imam sem našla še bel oval s šivi na katerega sem
prilepila monstero. Celoten oval sem za malo dimenzije privzdignila s 3d peno.
Potrebovala sem še napis, ki pa
sem ga tokrat našla v setu štampiljk Wood pallet background. Napis je
sestavljen iz dveh štampiljk. Baner sem najprej odtisnila v barvi Dark night in
ga nato še embosirala s prozonim embosing prahom, da je že tako temno modra
barva postala še temnejša. Ker pa sem želela še
malo zlate barve sem napis prav tako
embosirala z zlatim antique gold embosing prahom.
Pri tej voščilnici osnove nisem prav nič zmanjšala, saj so mi bile barve na ozadju zelo všeč in sem želela da prekrijejo celotno ozadje voščilnice.
I also used a stencil cube builder on this card. This time I used only
two colors to shade the background - Nimbus and Dark night. For the central
motif, I chose Monstera cutting die,
which I first cut out of white cardstock, which I painted with the direct to
paper technique with a mountain pine ink pad. I embossed the monstera shadows
twice with gold antique gold embossing powder and cut them out with the
corresponding cutting dies. In the end, I prepared a flower pot in the
background colors, where I arranged the leaves of the monstera. In the stock of
cutouts I have, I also found a white oval with seams on which I glued the
monstera. I lifted the whole oval for a little dimension with 3d foam.
I also needed a sentiment and this time I found it in the set of Wood
pallet background stamps. The sentiment consists of two stamps. I first stamped the banner in Dark night and then embossed it with transparent embossing
powder, so that the already dark blue color became even darker. However,
because I wanted a little more gold, I also embossed the sentiment with antique
gold embossing powder.
With this card, I didn't reduce the base at all, as I really liked the
colors on the background and I wanted them to cover the entire background of
the card.


Vedno ko ustvarjam več voščilnic
zapored nastane tudi kakšna, ki mi je še posebej všeč. Tokrat je to spodnja
voščilnica. Cube builder stencil sem tokrat na papir postavljala malo drugače,
tako da vzorec ni tvoril tipičnih kock. Tokrat sem si zamislila, da bi s
pomočjo seta rezalnih šablon Trigonometry izrezala različne trikotnike. Ker pa
mi je bila voščilnica iz samih pisanih trikotnikov predolgočasna sem naredila
še par zlatih trikotnikov v različnih velikostih. Zlate trikotnike sem naredila
tako da sem bel karton dvakrat embosirala z antique gold embosing prahom. Tako
sem dobila lep kovinski videz. Nato pa sem s pomočjo rezalnih šablon izrezala
trikotnike.
Pripravila sem si še ozadje za
voščilnnico. Najprej sem sredino belega kartončka posenčila z nimbus blazinico.
Ker to ni bilo dovolj za ozadje in sem želela še nekaj več, sem s čopičem
našpricala nekaj kapljic barve v odtenkih nimbus in cloudy sky. Končno sem bila
zadovoljna z ozadjem. Trikotnike sem lepo razporedila in jih prilepila tako da
se malo prikrivajo. Nektere sem prilepila kar z tekočim lepilom, pri drugih pa
sem uporabila 3d peno ali pa kappa ploščo* za še več dimenzije. Iz večjih
zlatih trikotnikov sem dobila še kar veliko drobnih zlatih pikic, ki sem jih
uporabila na voščilnici.
Ostalo mi je le še odtisniti napis, ki pa sem ga tokrat
odtisnila z črno pigmento blazinico Obsidian.
Voščilnici sem čisto na koncu
dodala še papir, ki sem ga ob robovih embosirala z zlatim embosing prahom in
podložila pod osrednji motiv voščilnice.
*Namig: Kappa plošča je v bistvu
pena, ki je na obeh straneh obdana s papirjem in stinjena skupaj. Če zaščitni
papir odstranimo lahko kappa ploščo režemo z rezalnimi šablonami. Kappa plošča
se sicer uporablja v arhitekturi za izdelavo maket.
Every time I create several cards in a row, I create one that I especially
like. This time it’s the card below. I placed the cube builder stencil on paper
a little differently this time so that the pattern did not form typical cubes.
This time, I imagined using a set of Trigonometry cutting dies to cut out
different triangles. However, because the card from the colorful triangles
itself was too boring, I made a couple of golden triangles in different sizes.
I made the gold triangles by embossing the white cardboard twice with antique
gold embossing powder. So I got a nice metallic look. Then I cut out the
triangles with the help of cutting dies.
I also prepared a background for the card. First, I shaded the center
of the white card with a nimbus ink pad. Since that wasn’t enough for the
background and I wanted something more, I sprayed a few drops of paint in
shades of nimbus and cloudy sky with a brush. I was finally happy with the
background. I arranged the triangles nicely and glued them together so that
they covered a little. I glued some of them with liquid glue, while for others
I used 3d foam or kappa board * for even more dimensions. From the larger gold
triangles, I got quite a few tiny gold dots, which I used on the card.
All I had to do was stamp the sentiment, this time I stamped it with a
black pigmented Obsidian ink pad.
At the very end, I added paper to the card, which I embossed on the
edges with gold embossing powder and lined under the central motif of the
greeting card.
* Tip: Kappa board is basically foam that is surrounded on both sides by paper and glued together. If the protective paper is removed, the kappa board can be cut with cutting dies. Kappa board is otherwise used in architecture to make mock-ups.


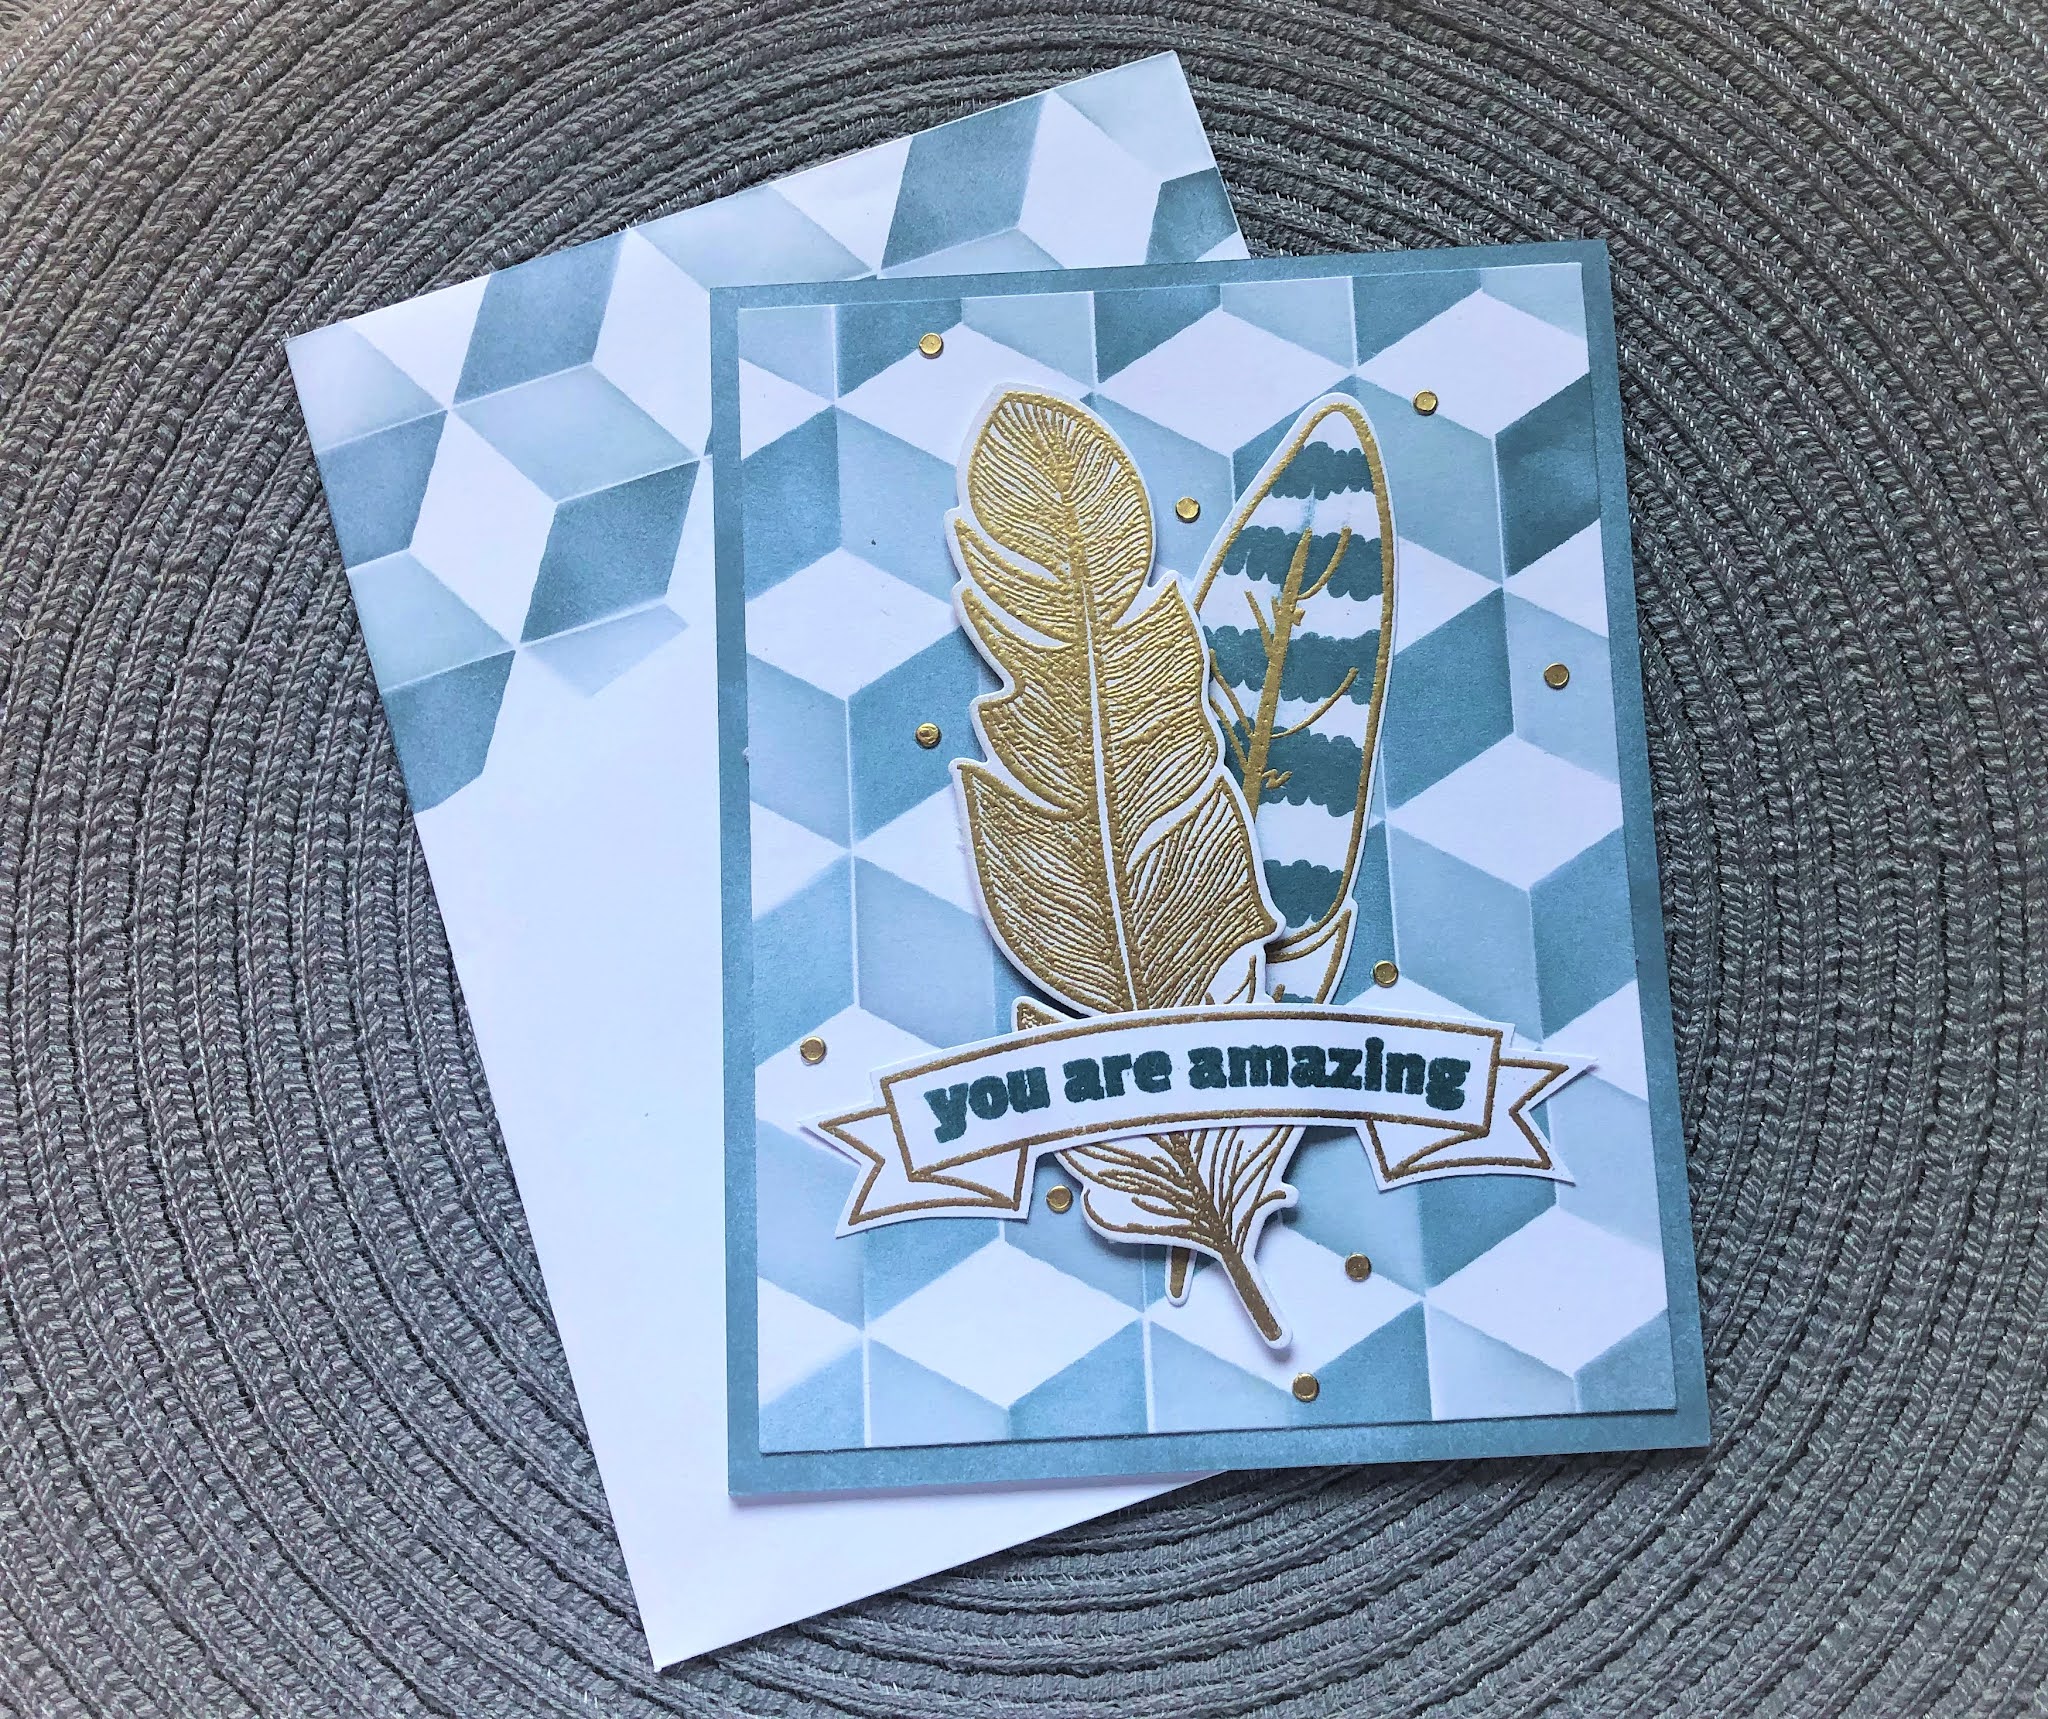
In že smo pri četrti voščilnici tega seta. Barvna paleta vseskozi ostaja ista. Ozadje sem s pomočjo stencil šablone posenčila v odtenkih misty morning in cloudy sky. Tokrat sem si za osrednji element izbrala dve peresi. Najprej sem mislila peresi narediti samo v zlati barvi, pa mi rezultat ni bil preveč všeč. Zato sem na eno od peres odtisnila še senco v odtenku cloudy sky. Motiv se je takoj malo bolj povezal z ozadjem. Za dokoknčanje voščilnice sem potrebovala le še napis. Tudi tokrat sem se odločila narediti dvobarvni baner. Sam bener sem najprej zlato embosirala in nato napis odtisnila z cloudy sky blazinico. Ker sem želela ozadje še malo popestriti in skriti kakšno drobno napakico sem po celotni voščilnici razporedila drobne zlate pikice, ki so mi ostale od trikotnikov pri prejšnji voščilnici.
And we are already at the fourth card of this set. The color palette
remains the same throughout. I shaded the background in shades of the misty morning
and cloudy sky with the help of a stencil. This time I chose two feathers as the
central element. At first, I thought to make the feathers only in gold, but I
didn't like the result too much. So I stamped a shadow in a cloudy sky shade on
one of the feathers. The motif immediately connected a little more with the background.
All I needed to complete the card was a sentiment. Again, I decided to make a
two-tone banner. I first embossed the banner with gold and then stamped the
sentiment with a cloudy sky pad. Since I wanted to spice up the background a
bit more and hide some small mistakes, I arranged the tiny golden dots leftover from the triangles in the previous card all over the card panel.


Najprej sem si z stencil šablono
pripravila ozadje v odtenkih cloudy sky in nimbus. Ko sem dobila takšen lep
karirast vzorec pa sem celotno ozadje prerezala na polovico. Iz enega dela sem
izrezala besedico »happy« in jo umestila na zgornji del voščilnice, ki sem ga
predhodno poškropila z zelo razredčeno barvo v prej omenjenih odtenkih.
Na spodnji del voščilnice pa sem nalepila besedico "birthday" v beli barvi.
Voščilnici je še vedno nekaj manjkalo, ampak ker je bilo že vse zalepljeno
nisem vedela kaj še lahko naredim. Pobrskala sem po moji zalogi washi trakcev
in naletela na enega v črni barvi z drobnim geometrijskim vzorcem. Kot nalašč
za mojo voščilnico. Problem je bil ta da je bil trak preširok in ga nisem mogla
lepo umestiti med zgornji in spodnji del voščilnice. Potem pa sem na mizi
zagledala ostanek od voščilnice, ki sem ji odrezala malo roba, kot nalašč je
bil ravno prav dolg in širok da sem moj washy trak lahko ovila okoli tega
belega papirčka. In ga prilepila na sredino voščilnice. Za malo bleščavosti sem
dodala še par drobnih bleščic z prozornim markerjem Wink of Stella.
One last greeting card for this men’s set. When I was thinking a bit
about how to make this set of cards, this was the first idea that came to me.
The problem arose because, in my Altenew collection, I did not find any cutting
dies with sentiments or the alphabet. So this time I reached for another
brand of cutting dies, and I didn’t know if I should show you this card at all until the last minute.
First, I used a stencil to prepare a background in shades of cloudy sky
and nimbus. When I got such a nice checkered pattern, I cut the entire background in half. I cut
out the word “happy” from one part and placed it on the top of the greeting
card, which I had previously sprayed with a very diluted paint in the
aforementioned shades.
I glued the word "birthday" in white on the bottom of the card. The card
was still missing something, but since everything was already glued I didn’t
know what else I could do. I rummaged through my stock of washi tapes and came
across one in black with a tiny geometric pattern. Perfect for my card. The
problem was that the tape was too wide and I couldn’t place it nicely between
the top and bottom of the card. Then I saw the rest of the white card on the
table, which I cut off a bit of the edge of, it was just right long and wide
enough for me to wrap my washi tape around this white piece of paper. And glued
it to the center of the card. For a little glitter, I added a couple more tiny
glitters with a transparent Wink of Stella marker.


Eno izmed navodil, ki mi jih je
poslala Erum je bilo tudi to, da voščilnice lepo zapakiramo in uporabimo nekaj
recikliranja. Jaz sem za receklirani element izbrala kar škatlo od kosmičev.
Škatlo sem razrezala in prilagodila velikosti voščilnic, ki sem jih prej
zapakirala skupaj z ujemajočimi kuvertami v celofanaste vrečke.
Za polepšanje škatle sem si
pripravila nekaj papirja, ki sem ga s stencil šablono in barvnimi blazinicami
pobarvala tako da se ujema z voščilnicami. Ostal mi je še en pobarvan trak v
svetlejših odtenkih, ki sem ga uporabila za belly bence na škatlici. Voščilo
sem odtisnila z embosing blazinico in embosirala z antique gold embosing
prahom.
In the end, all I have to do is show you how I packed all the cards.
One of the instructions Erum sent me was also to pack the cards nicely
and use some recycling. I chose a box of flakes for the recycled item. I cut
the box and adjusted it to the size of the cards I had previously packed along
with the matching envelopes in cellophane bags.
To beautify the box, I prepared some paper, which I painted with a
stencil and ink pads to match the cards. I was left with another
painted strip in lighter shades that I used for the belly bence on the box. I
stamped the sentiment with an embossing pad and embossed it with antique gold
embossing powder.


- Altenew: Nesting labels
- Altenew: Golden feather
- Altenew: Trigonometry
- Altenew: Monstera 3D
- Najlepši par: Kreativni ovali
- Mavelu: Zabavni pravokotniki
- Sizzix: Alphanumeric shadow upper 664729
- Altenew: BAF Bellaromma hybrid tea rose
- Altenew: Golden feather
- Altenew: Wood pallet background
- Altenew: Trigonometry
- Altenew: Cube builder
- Altenew: Cloudy sky, Misty morning, Nimbus, Dark night, Morning frost, Mountain pine, Obsidian pigment ink
- Altenew: Antique gold
- Ranger: Clear
Tako prvi del mojega ustvarjanja
je končan. V naslednjih dneh pa vam pokažem še žensko različico.
So the first part of my creation is over. In the next few days, I will
show you another female version.


These are SO gorgeous Sara! You have done a MARVELOUS job! Love each and every card!!
OdgovoriIzbrišiThank you for submitting your wonderful work to the AECP assignment gallery.