AECP: FINAL CHALLENGE LEVEL 1 - part 2

Živijo!
Pred mano je še drugi del zakljička prvega levela pri AECP.
Tokrat sem ustvarjala za ženske.
Nastalo je pet čudovitih voščilnic z vrtnicami. Pa si
poglejmo kaj sem izdelala.


Najprej sem si tako kot za voščilnice za moške pripravila
vse potrebno. Odtisnila sem si vse vrtnice in liste, pa vse metuljčke, pripravila napise, izrezala vsa
ozadja in pripravila vse osnove za voščilnice. Na takšen način lažje delam in
tudi delo hitreje steče.
Prva voščilnica, ki je nastala je dokaj enostavna, nobenih
posebnih dimenzij nisem uporabljala, naredila sem jo čimbolj enostavno.
Iz belega kartona sem si najprej izrezala ozadje s pomočjo
Altenew šablone dotted scales. Ta šablona
naredi zelo zanimiv nežen izrez, ki bo siguno velikokrat v uporabi. Ko
sem začela na to ozadje postavljati vrtnice, metuljčke in napis pa se mi je
voščilnica zdela prazna. Zato sem se odločila da levi spodnji del voščilnice
posenčim z roza barvo. Ker pa me pri senčenju rado zanese in potem posenčim že
skoraj celotno voščilnico, sem si tokrat pripravila masko v obliki kroga in jo
postavila na izrezano ozadje. Posenčen krog naredi voščilnico veliko bolj
zanimivo. Ostalo mi je le še da prilepim vse elemente na voščilnico.
Hi!
In front of me is the second part of the conclusion of the first level at the AECP. This time I was creating for women.
The result is five beautiful greeting cards with roses. Let's see what I made.
First, just like cards for men, I prepared everything I needed. I stamped all the roses and leaves, then all the butterflies prepared the sentiments, cut out all the backgrounds, and prepared all the bases for the greeting cards. This way I work easier and the work also runs faster.
The first greeting card that was created is quite simple, I didn't use any special dimensions, I made it as simple as possible.
I first cut out the background from the white cardboard using an Altenew dotted scales die. This template makes a very interesting delicate debossing that will surely be used many times. When I started placing roses, butterflies, and an inscription on this background, the greeting card seemed empty to me. So I decided to shade the bottom left corner of the greeting card with pink. However, because I like to be overwhelmed by shading and then I shade almost the entire greeting card, this time I prepared a mask in the shape of a circle and placed it on the cut-out background. The shaded circle makes the greeting card much more interesting. All I had to do was stick all the elements on the greeting card.


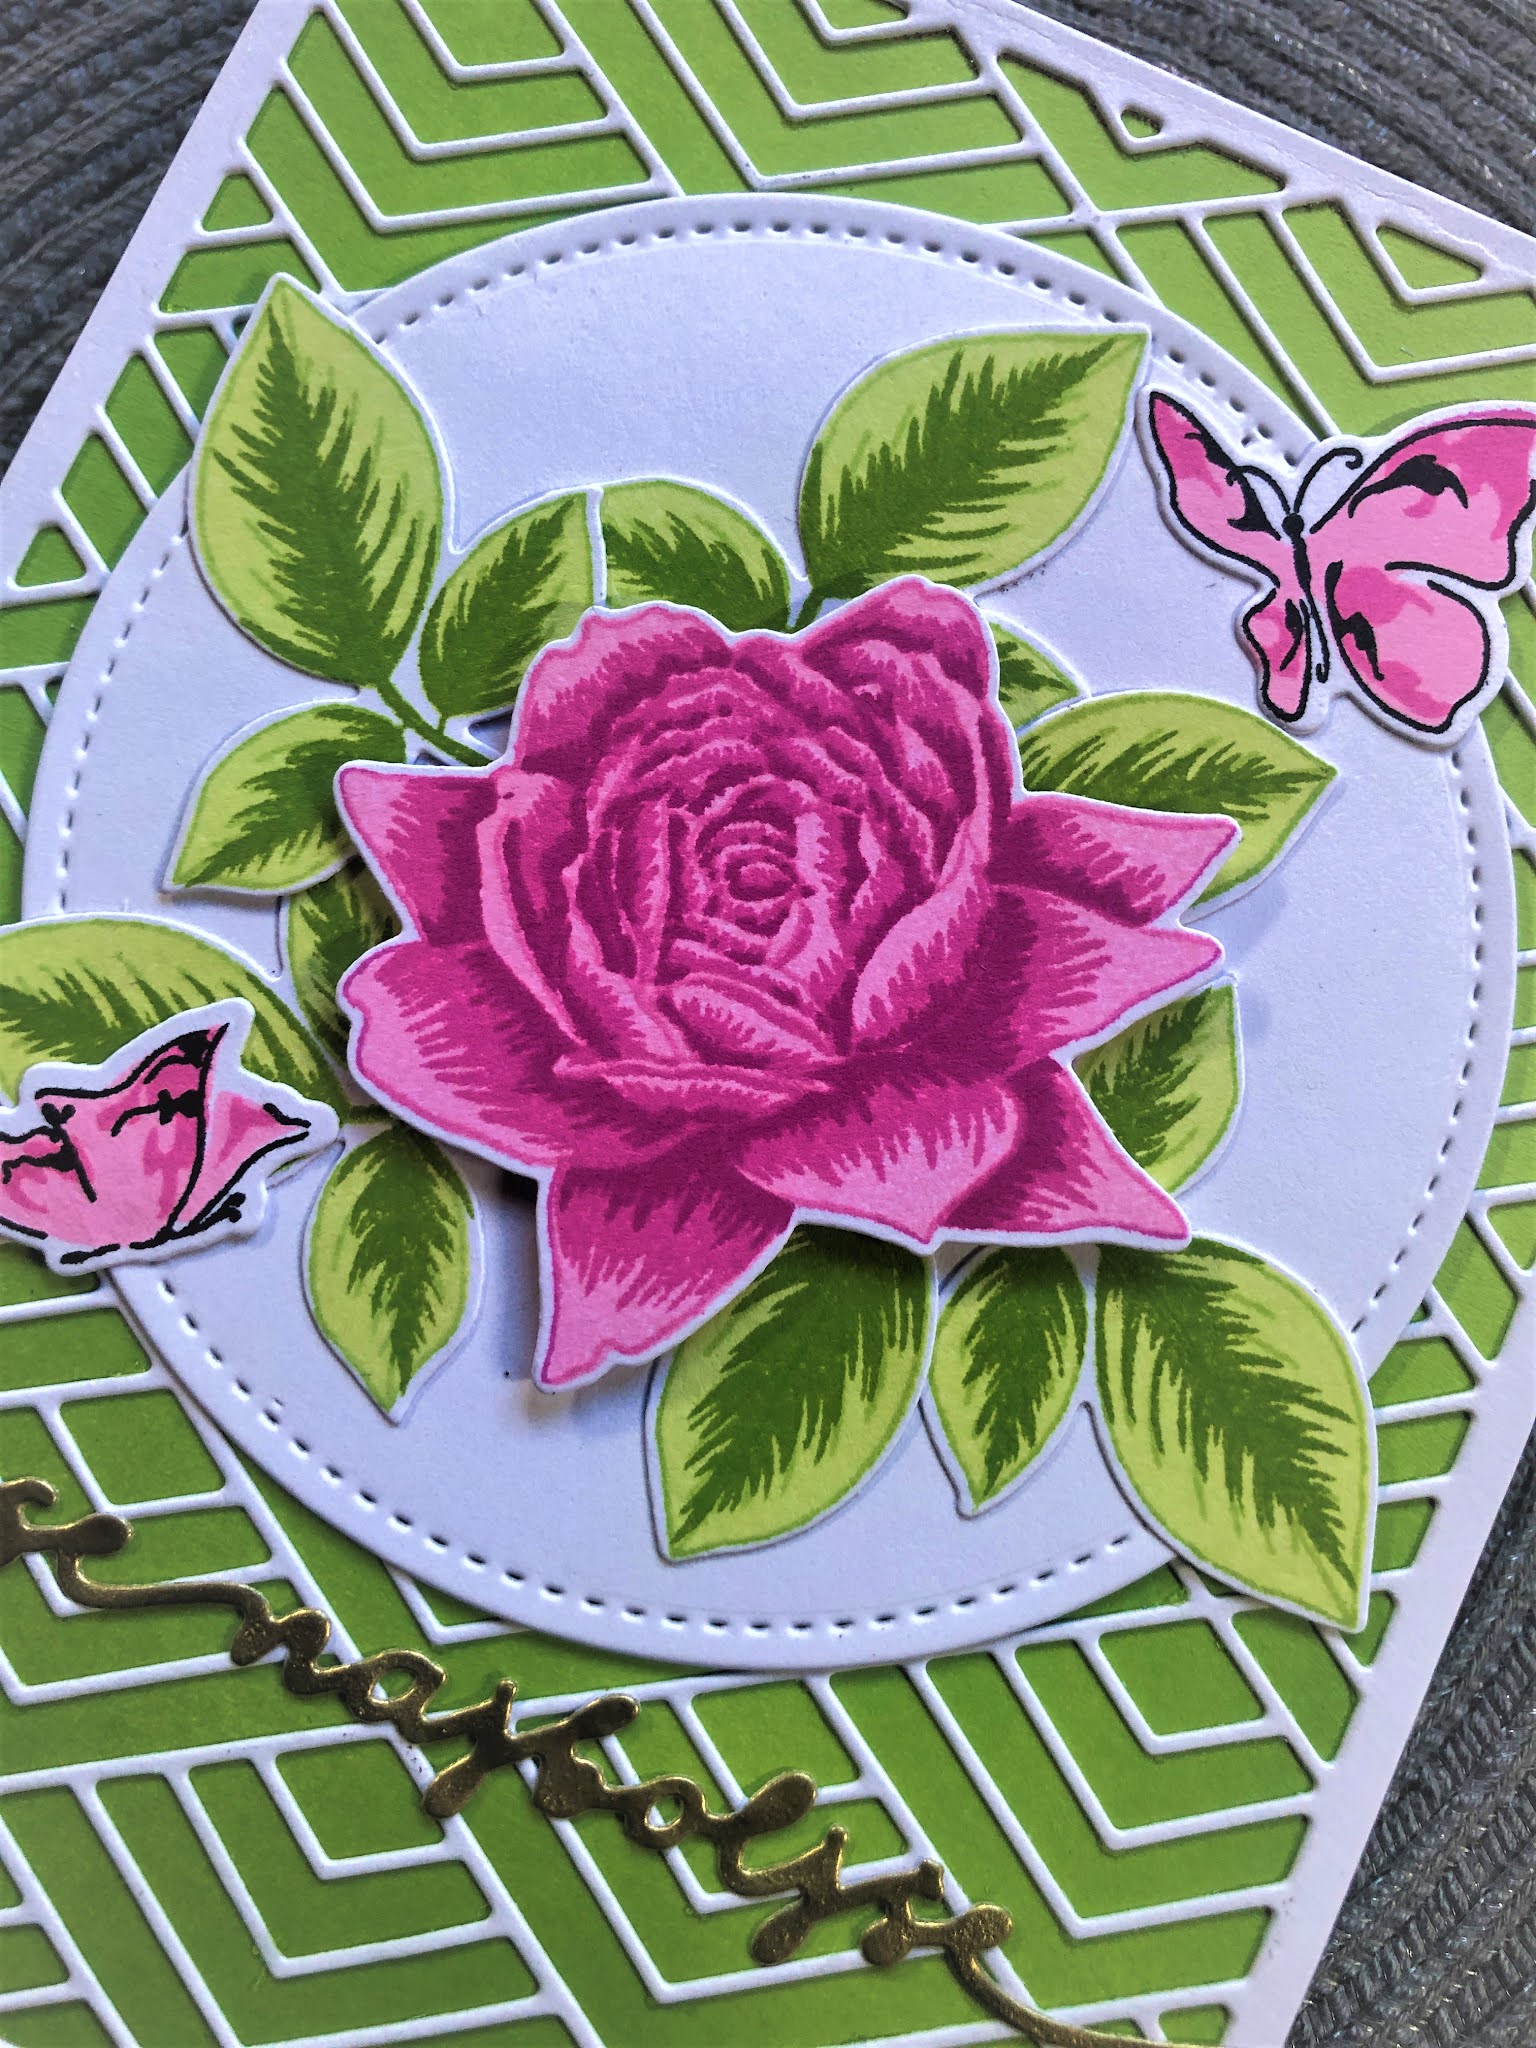
Druga voščilnica je pred nami. Tokrat na voščilnici prevladuje lepa zelena barva. Pravzaprav tri. Ozadje sem najprej posenčila z odtenki limeade, lime in fresh leaf. Prehodi se zaradi uporabljenega belega ozadja čez posenčeno zeleno ozadje bolj slabo vidijo. Belo ozadje sem izrezala s pomočjo šablone Stacked diamonds in ga prilepila čez zelen kartonček. S pomočjo rezalnih šablon sem si pripravila še bel krog, ki sem ga umestila na sredino voščilnice in nanj prilepila vrnico in dva roza metuljčka. Cvet vrtnice sem tokrat malo privzdignila s pomočjo 3d pene. Voščilnici je manjkal le še napis, ki sem ga prav tako izrezala z rezalnimi šablonami, nato pa izrezek embosirala z zlatim embosing prahom.
The second card is in front of us. This time, the card is dominated by beautiful green color. Actually three. I first shaded the background with shades of limeade, lime, and fresh leaf. The transitions over the shaded green background are less visible due to the white background used. I cut out the white background using a Stacked diamonds stencil and pasted it over the green cardboard. With the help of cutting dies, I prepared a white circle, which I placed in the middle of the card and glued a rose and two pink butterflies on it. I raised the rose flower a little this time with the 3d foam. The only thing missing from the greeting card was the sentiment, which I also cut out with cutting dies, and then embossed the cutout with gold embossing powder.


Za tretjo voščilnico sem si najprej pripravila potiskano ozadje iz vrtnic. Čeprav so štampiljke večplastne sem uporabila tokrat samo obrobljeni del in pa del, ki vrtnico obarva. Ker sem namenoma puščala kar nekaj prostora med vrtnicami, sem lahko dodala še nekaj zelenih listkov, da je ozadje bolj zanimivo. Celotno ozadje sem izrezala še z rezalno šablono, da je dobilo zanimiv okvir s šivi. Nato pa sem se odločila, da to ozadje razrežem na dva dela po diagonali. Pripravila sem si še en kartonček, ki sem ga posenčila z roza barvo in poškropila z perfect pearls v odtenku confetty white. Na sliki se sicer ne vidi prav dobro ampak v živo, se voščilnica prav lepo zasveti. Dodala sem še napis, ki sem ga embosirala z zlatim embosing prahom in vočilnica je bila končana.
For the third greeting card, I first prepared a stamped background of roses. Although the stamps are multi-layered, this time I used only the edged part and the part that colors the rose. Since I was intentionally leaving quite a bit of space between the roses, I was able to add a few green leaves to make the background more interesting. I cut out the whole background with a cutting template to get an interesting frame with seams. Then I decided to cut this background into two parts diagonally. I prepared another card, which I shaded with pink and sprinkled with perfect pearls in a shade of confetti white. It can't be seen very well in the picture, but in life, the greeting card lights up nicely. I added a sentiment that I embossed with gold embossing powder and the greeting card was finished.


Še dve voščilnici nas čakata do konca objave. Za četrto voščilnico sem si zamislila ozadje v
živih barvah in bele rože. Nekaj podobnega sem enkrat že pripravila za AECP,
ker mi je bil rezultat takrat všeč sem tokrat vajo ponovila.
Tudi tokrat sem si najprej posenčila ozadje v treh roza
odtenkih, ko sem bila s senčenjem zadovoljna sem celotno ozadje poškropila z
perfect pearls. Z rezalno šablono Shutter cover die sem si izrezala še en bel
izrez in ga prilepila čez posenčeno ozadje. Pripravila sem si še izreze vrtnic,
ki pa sem jih tokrat samo embosirala z zlatim embosing prahom. Tokrat sem se
odločila vrtnico z zelenjem postaviti v zgornji kot voščilnice. Cvet vrnice sem
privzdignila s 3d peno in dodala še zlato embosiran napis na črnem kartončku.
Ker je bilo celotno ozadje malo premalo za voščilnico in je po mojem mnenju
pustilo prevelik rob okoli ozadja, sem se odločila uporabiti še svetleč papir z
bleščicami in tako celotni voščilnici dodati še malo več sijaja.
Two more greeting cards are waiting for us until the end of the post. For the fourth greeting card, I envisioned a background in vivid colors and white flowers. I prepared something similar for AECP once because I liked the result then, I repeated the exercise this time.
Also this time I first shaded the background in three shades of pink, when I was happy with the shading I sprayed the whole background with perfect pearls. With the Shutter, cover die cutting die I cut out another white cut out and pasted it over the shaded background. I also prepared cutouts of roses, which this time I just embossed with gold embossing powder. This time I decided to place a rose with greens in the top corner of the greeting card. I lifted the flower of the spring with 3d foam and added a gold embossed sentiment on a black card. Since the whole background was a little too small for the card base and in my opinion left too much edge around the background, I decided to use more glitter paper to add a little more shine to the whole card.


Še zadnja voščilnica mi je ostala za pokazati. Tokrat sem si
želela samo malo barvati, zato sem si vrtnice odtisnila na bel papir in malo
barvala tako kot se mi je zdelo, da bo vredu s polychromos barvicami. Vrtnice
sem najprej pobarvala z odtenkom 130 (salmon), nato pa dodala sence v odtenkih
128 (light purple) in 133 (magenta). Ko sem bila z barvanjem zadovoljna sem
pobarvala še liste v odtenkih 170 (may green), 112 (leaf green) in 166 (grass
green). Celotno pobarvano ozadje sem nato izrezala še z rezalno šablono š šivi. Ostal mi je le še napis, ki sem ga tudi tokrat izrezala
z rezalno šablono. Napis sem na koncu za še več dimenzije podložila s kappa
ploščo in ga prilepila na voščilnico. Pod izrezano ozadje z vrtnicami sem tudi
tokrat prilepila malo bleščečega papirja.
The last greeting card was left for me to show. This time I just wanted to color a little, so I stamped the roses on white paper and colored a little just like I thought it would be fine with polychromos crayons. I first colored the roses with a shade of 130 (salmon) and then added shades in shades of 128 (light purple) and 133 (magenta). When I was satisfied with the coloring, I also colored the leaves in shades of 170 (may green), 112 (leaf green), and 166 (grass green). I then cut out the entire painted background with a cutting die with seems. All that was left for me was the sentiment, which I cut out with a cutting die this time as well. In the end, I lined the sentiment with a kappa foam for even more dimensions and glue it on the card. I glue a little glittery paper under the cut-out background with roses this time as well.


Tako pa smo prišli do konca voščilnic. Vse kar je še ostalo
je da vam pokažem kako sem voščilnice zapakirala.
Ostala mi je še ena kartonasta škatla od kosmičev, zato sem
se na enak način kot sem naredila embalažo za moške odločila narediti tudi za
ženske. Tudi tokrat sem si najprej pripravila potiskan papir z vrtnicami, ki sem ga prilepila na izrezano osnovo za škatlico. Tokrat nisem uporabila belly bence traku ampak sem voščilo nalepila kar
direktno na samo embalažo. Voščilo sem odtisnila na kartonček, ki sem ga prej
izrezala z setom nesting labels die in ga umestila na sredino embalaže.
And so we came to the end of the cards. All that’s left is to show you how I packaged the cards.
I was left with another cardboard box of flakes, so in the same way, I made the packaging for men, I decided to make it for women as well. This time, too, I first prepared stamped paper with roses, which I glued to the cut-out base for the box. This time I didn't use belly bence, but I stuck the sentiment directly on the packaging. I stamped the sentiment on a cardstock I had previously cut out with a set of nesting labels die and placed it in the middle of the package.


Za izdelavo voščilnic in embalaže sem uporabila:
Rezalne šablone:
- Bold blossom (Altenew)
- Nesting labels die(Altenew)
- Painted Butterflies (Altenew)
- Dotted scales debossing cover die (Altenew)
- Stacked diamonds cover die (Altenew)
- Shutter cover die (Altenew)
- Voščila na vrvici (Najlepši par)
- Base frames set circle (Craft&You design)
- Zabavni pravokotniki (Mavelu)
- Čestitke (Mavelu)
Štampiljke:
- Bold blossom (Altenew);
- Bejeweled (Altenew)
- Painted butterflies (Altenew);
- Voščila za vse priložnosti (Najlepši par)
- Štampiljke z napisi (Darilnica Klavdija)
Barvne blazinice:
- Spring bouquet die inks (Altenew)
- Obsidian pigment ink (Altenew)
- Antique gold (Altenew)
- Confetti white
Polychromos barvice:
- 133 magenta
- 130 salmon
- 128 light purple
- 170 may green
- 112 leaf green
- 166 grass green


Absolutely wonderful job, Sara! Your work is amazing!! Thank you for submitting your gorgeous work to the AECP assignment gallery.
OdgovoriIzbriši